Hi all, things have got on top of me recently so sincere apologies about the delay in posting my block info, also the fabric was out in the post yesterday so Brits may have received it already and US ladies in a week or so!
So, in your package will be:
8 x solids/plain squares
1 x patterned/fussy cut square
Some scraps
The block I have chosen is a wonky star block!
I have included a small amount of scraps but was hoping you would all add a little of your own fabric scraps that co-ordinate too.
Last week my daughter Rosie turned one, seeing as we initially didn't know if she'd ever reach her first birthday I feel truly blessed, so this quilt will be her special birthday quilt! (To add to her increasing stash of quilts heh!)
I'm sure you probably all know how to make a wonky star block but here is a link
http://owensolivia.blogspot.co.uk/2012/10/wonky-star-block-tutorial.html?m=1
Block size will be 12" finished and all seams 1/4"
Now here's a cheeky request, if you have any spare fabric after completing the block I would love to receive a 6" finished star block of any design of your choice to work into my borders and pieced backing!
I hope I've covered everything! Please feel free to contact me on twitter, here or at kellyemowen@hotmail.com
Oh and here is my finished block!
Enjoy! Kellye xxx
The Anything Goes Quilt Bee is a virtual quilting bee started in summer 2012 to bring together quilters from around the world. Over the next 12 months the bee members will work together to create 12 gorgeous quilts! We hope you enjoy reading about our progress!
Tuesday, 12 March 2013
Sunday, 6 January 2013
January's Block - Part 2!
The first part of the Twin Peaks block involved letting go and do crazy patch piecing.
The second part involves using the crazy block as the center of a modified log cabin. Each person will get instructions with their fabric, so check to see how many rounds you'll need to do. The below instructions are for four rounds. Photos are on Flickr in the order of the instructions. I have included additional notes with the pictures; I did run into some problems, but no ripping of seams was involved and I really like the way the final block turned out. :)
A few learnings:
Have fun & Happy Quilting!
Karen
Directions for part 2:
The
width of the logs should be at least 1.5” wide at their narrowest
point. The piece from part 1 does NOT need to be centered in the square,
so each log can be a different width.
On a design wall, make a rectangle 24” wide x 31.5” high using masking or painter’s tape.
Using
the background fabric, make three rounds of logs. The most important
thing to remember is to check that the log will extend a little bit past
the piece it’s sewn to for the entire width of the log.
Take
some time to consider how long the finished round will be, since the
WOF is only 40” or so. This is especially important with the cream
fabric, since you’ll need to do two rounds with it.
Round 1: Cream fabric, seams should be pressed away from the crazy pieced center.
Top
Log: The first strip should along the top of the block. Make it a few
inches longer than the width of the piece it will be sewn to. Sew to
crazy center, then trim the edges of the log to match the edges of the
crazy center.
Side
Log: This is the same as the top, but the log will be longer. “Wonk”
this log - be sure the length takes into account the angle, so that when
it’s trimmed, it will extend all the way to the top and bottom of the
piece.
Bottom Log: Same as the Top Log, but can be thinner or wider. Again, trim the ends to match the width of the piece it’s sewn to.
Last
Log: This will be the longest log and should be “wonked.” This can be
thinner or wider than the other logs and can be at a different angle
than the Side Log. If you don’t have a piece long enough, you can
connect to shorter pieces with a leftover crazy piece (press seams away
from the crazy piecing).
Round 2: Orange or Grey Fabric
Repeat the same steps as for Round 1.
Round 3: Orange or Grey Fabric (if you used orange in round 2, use Grey for Round 3 and vice versa)
Repeat the same steps as for Round 2.
Round 4: Cream
Before
you start cutting - Figure out how long and wide your strips will need
to be by placing the WIP inside the rectangle you have on your design
wall. REMEMBER: The last log in this round will need to be at least
31.5” long, so figure out how wide this should be before cutting the
fabric.
Repeat the same steps as for Round 3.
The finished block should now be 24” wide and 31.5” high.
| Finished Crazy Block |
| Finished Twin Peak block - 4 rounds |
The second part involves using the crazy block as the center of a modified log cabin. Each person will get instructions with their fabric, so check to see how many rounds you'll need to do. The below instructions are for four rounds. Photos are on Flickr in the order of the instructions. I have included additional notes with the pictures; I did run into some problems, but no ripping of seams was involved and I really like the way the final block turned out. :)
A few learnings:
- You can trim the crazy block to be shorter and/or thinner.
- The more drastic the angle, the more fabric you'll need for the last round and the harder it will be to keep to a 1" finished log for each round.
- The crazy block does not need to be centered or angled in a certain way. If you want to put it in the upper left hand corner, go for it!
- There's no need to rip seams. If one of the fabric strips is too short for a round, make it longer by piecing in left over crazy piecing. If there's a "hole" in the last round because there's not enough solid fabric, use left over crazy piecing or left over solid.
- If you get stuck, take a deep breath, a sip of your favorite beverage, and turn the block upside down or sideways. Use the design wall to see how the WIP block looks at different angles and consider trimming more fabric off the block to make room for the next round...and remember you cannot make a mistake on this one!
- Break the rules if you have to.
Have fun & Happy Quilting!
Karen
Directions for part 2:
The
width of the logs should be at least 1.5” wide at their narrowest
point. The piece from part 1 does NOT need to be centered in the square,
so each log can be a different width.
On a design wall, make a rectangle 24” wide x 31.5” high using masking or painter’s tape.
Using
the background fabric, make three rounds of logs. The most important
thing to remember is to check that the log will extend a little bit past
the piece it’s sewn to for the entire width of the log.
Take
some time to consider how long the finished round will be, since the
WOF is only 40” or so. This is especially important with the cream
fabric, since you’ll need to do two rounds with it.
Round 1: Cream fabric, seams should be pressed away from the crazy pieced center.
Top
Log: The first strip should along the top of the block. Make it a few
inches longer than the width of the piece it will be sewn to. Sew to
crazy center, then trim the edges of the log to match the edges of the
crazy center.
Side
Log: This is the same as the top, but the log will be longer. “Wonk”
this log - be sure the length takes into account the angle, so that when
it’s trimmed, it will extend all the way to the top and bottom of the
piece.
Bottom Log: Same as the Top Log, but can be thinner or wider. Again, trim the ends to match the width of the piece it’s sewn to.
Last
Log: This will be the longest log and should be “wonked.” This can be
thinner or wider than the other logs and can be at a different angle
than the Side Log. If you don’t have a piece long enough, you can
connect to shorter pieces with a leftover crazy piece (press seams away
from the crazy piecing).
Round 2: Orange or Grey Fabric
Repeat the same steps as for Round 1.
Round 3: Orange or Grey Fabric (if you used orange in round 2, use Grey for Round 3 and vice versa)
Repeat the same steps as for Round 2.
Round 4: Cream
Before
you start cutting - Figure out how long and wide your strips will need
to be by placing the WIP inside the rectangle you have on your design
wall. REMEMBER: The last log in this round will need to be at least
31.5” long, so figure out how wide this should be before cutting the
fabric.
Repeat the same steps as for Round 3.
The finished block should now be 24” wide and 31.5” high.
Friday, 4 January 2013
January's Block: Log Cabin
Hello, Ladies! Fabric and instructions are in the mail.
I've been reading and re-reading the modern quilting books I've collected in 2012 for the past month. So many beautiful quilts, with many modern ideas, so it was hard to choose. Quilting Modern by Jacquie Gering and Katie Pederson (Link to Book on Amazon.com) is the inspiration for this quilt, which combines crazy patch piecing and a modified log cabin. This is only my second modern quilt, so I'm very excited to try something new!
This quilt is called "Twin Peaks," because I've been watching Twin Peaks while putting these directions together AND because they're both crazy. There are two techniques that are new to me in this block - crazy piecing and wonky log cabin. Both require letting go of exact measurements and embracing what works.
The thing I like most about this quilt is there are no seams to match in the blocks!
I'll be sending the strips of fabric needed to make the center and the "log" fabric. I will also send specific instructions regarding the size of the centers, since each one will be a little bit different. There will be left over fabric; feel free to keep it for a small project or send it back to me.
I will also post photos to flickr in the order of the block build. If you have any questions, please shoot me an email or post a question. Have fun!
Directions:
Unless otherwise noted, all seams at 1/4" and seams should be pressed open.
Link to Flickr (AGQB Flickr)
Center of log cabin block (crazy patchwork):
Making the crazy center:
Continue to connect pieces together until the piece covers the rectangle made on the design wall. Trim to the size noted in your fabric pack instructions.
Note: Don't be afraid to cut the pieces that have already been pieced. The trim may be large enough to use as additional pieces to complete the crazy center.
I will post part 2: Log Cabin tomorrow.
I've been reading and re-reading the modern quilting books I've collected in 2012 for the past month. So many beautiful quilts, with many modern ideas, so it was hard to choose. Quilting Modern by Jacquie Gering and Katie Pederson (Link to Book on Amazon.com) is the inspiration for this quilt, which combines crazy patch piecing and a modified log cabin. This is only my second modern quilt, so I'm very excited to try something new!
This quilt is called "Twin Peaks," because I've been watching Twin Peaks while putting these directions together AND because they're both crazy. There are two techniques that are new to me in this block - crazy piecing and wonky log cabin. Both require letting go of exact measurements and embracing what works.
The thing I like most about this quilt is there are no seams to match in the blocks!
I'll be sending the strips of fabric needed to make the center and the "log" fabric. I will also send specific instructions regarding the size of the centers, since each one will be a little bit different. There will be left over fabric; feel free to keep it for a small project or send it back to me.
I will also post photos to flickr in the order of the block build. If you have any questions, please shoot me an email or post a question. Have fun!
Directions:
Unless otherwise noted, all seams at 1/4" and seams should be pressed open.
Link to Flickr (AGQB Flickr)
Center of log cabin block (crazy patchwork):
Making the crazy center:
| On a design wall or cutting mat, make a 10" x 20" or 10"x 17.5" rectangle using masking tape. I used a piece of muslin cut to the correct size. |
| Sew two strips of fabric together (there should be at least 10 strips in your fabric pack). |
| First cuts from all strip sets. |
| Connect the two piece patches together, offsetting the seams. Trim the seams to 1/4" and press open. |
| Beginning joins.... |
| Middle Joins |
Finished Crazy Center
|
Note: Don't be afraid to cut the pieces that have already been pieced. The trim may be large enough to use as additional pieces to complete the crazy center.
I will post part 2: Log Cabin tomorrow.
Happy Quilting!
Karen
Saturday, 8 December 2012
Bear Paws - the December block
First things first - a big apology for the lateness of this month's bee. This apology is coming to you straight from the jaws of sinus hell, my 5 year-old and I have been having a 'who can sound the most like Darth Vader' competition all week and it's rather slowed things down.
Given that it's so miserable and cold at the moment I've started thinking about next summer already. We are going to have our very first family camping trip, and I'd really like to have a camp-fire quilt to take with us. my grandmother Norah, used to make us camping blankets when I was little and I'd like to keep the tradition going.
I've gone for Bear Paws for my block, because I love the simplicity Bear Paw quilts. I've chosen Kona Charcoal for the background and a selection of flame coloured batiks for the paws. Batiks are a big step out of my comfort zone for me, but nothing else quite had that flame-like quality.
I've used this pattern from Quilt.com to give a 14" finished block. I will say that although the pattern is pretty easy to follow I would go easy on the seam allowances. I found my HSTs unaccountably smaller than the patterns until I decided to give a fairly scant 1/4" seam.
I hope you all have a wonderful Holiday season, please don't feel obliged to get these blocks back to me quickly. Everyone is so busy at this time of year and I won't be stitching it up until the spring.
A very Merry Christmas and all the best for 2013 to all of you!
Helen
x
Sunday, 4 November 2012
November block - Cheyenne block pattern
Sorry I half did the instructions and the fabric on Thursday night, the went away for a couple of days for my birthday. I've finished it all today though - Using lots of different fabrics took a while to sort!
I've finished it - here is the block you'll be making in November:
It's traditional name is Cheyenne block pattern and it can be attributed to the Kansas City Star in 1933. I wanted a striking but simple block where the fabrics could be scrappy. I like order in what I do so I thought I'd give you the same design, but then to add the interest give you lots of different fabrics so you can each create a different effect. It's also appropriate as the base fabrics are 1930s reproduction fabrics.
You will get in the post:
A piece of Kona Solid in Dark Violet for the background (I ordered navy for the background and the violet for my stash from Simply Solids but when they came I thought the violet looked better).
15 different pieces of fabrics, approximately 4-5 inches square.
I'd then like to follow Anna's idea and ask you to put in a square of something from your stash. If you have any 1930 reproduction fabrics then perfect but I've also added gingham and dots with a small pattern, or tiny stripes would work - I think delicate is the key!
Here are the fabrics I've used:
A selection of 1930s reproduction fabrics, a few I have picked up as fat quarters (on the left) and a 1930s fabric bundle from Tikki London which I discovered when searching for solids for another project a while back.
Then there are a couple of Flea Market Fancy and a few other bits and bobs from my stash that I felt tied in nicely with the other fabrics.
Finally here are some half yards I bought in the recent moving sale at Pink Castle Fabrics. The top five are from The Simple Life range by Riley Blake and the bottom two are Sweet on NY Mini Dot by Timeless Treasures. When I started pulling the fabrics together I discovered I needed more both to complete the block and to get the scrappy variety I wanted.
So here is what to do:
Cut the plain piece of violet fabric into 8 squares, each 4.25 inch.
Take the 15 pieces of fabrics I've sent and the one that you're adding and cut:
*IMPORTANT* a few of the pieces are smaller than 4.25 inch, but bigger than 3.5 inch, on at least one side so please measure them all and work out which ones you have to use for the smaller squares before cutting any fabric.
8 x 3.5 inch squares - these will stay as squares in the final block
8 x 4.25 inch squares - these will become the half square triangles in the final block
Take one of the violet squares and one of the patterned 4.25 inch squares and lay right sides together. Draw a line diagonally with a pencil/fabric pen and then sew seams 0.25 inch either side of this as shown on the violet square above. Then cut along your pencil/pen line.
Repeat with the other 7 pairs.You only need one of each patterned triangle for this design but hopefully you can use the rest for something else.
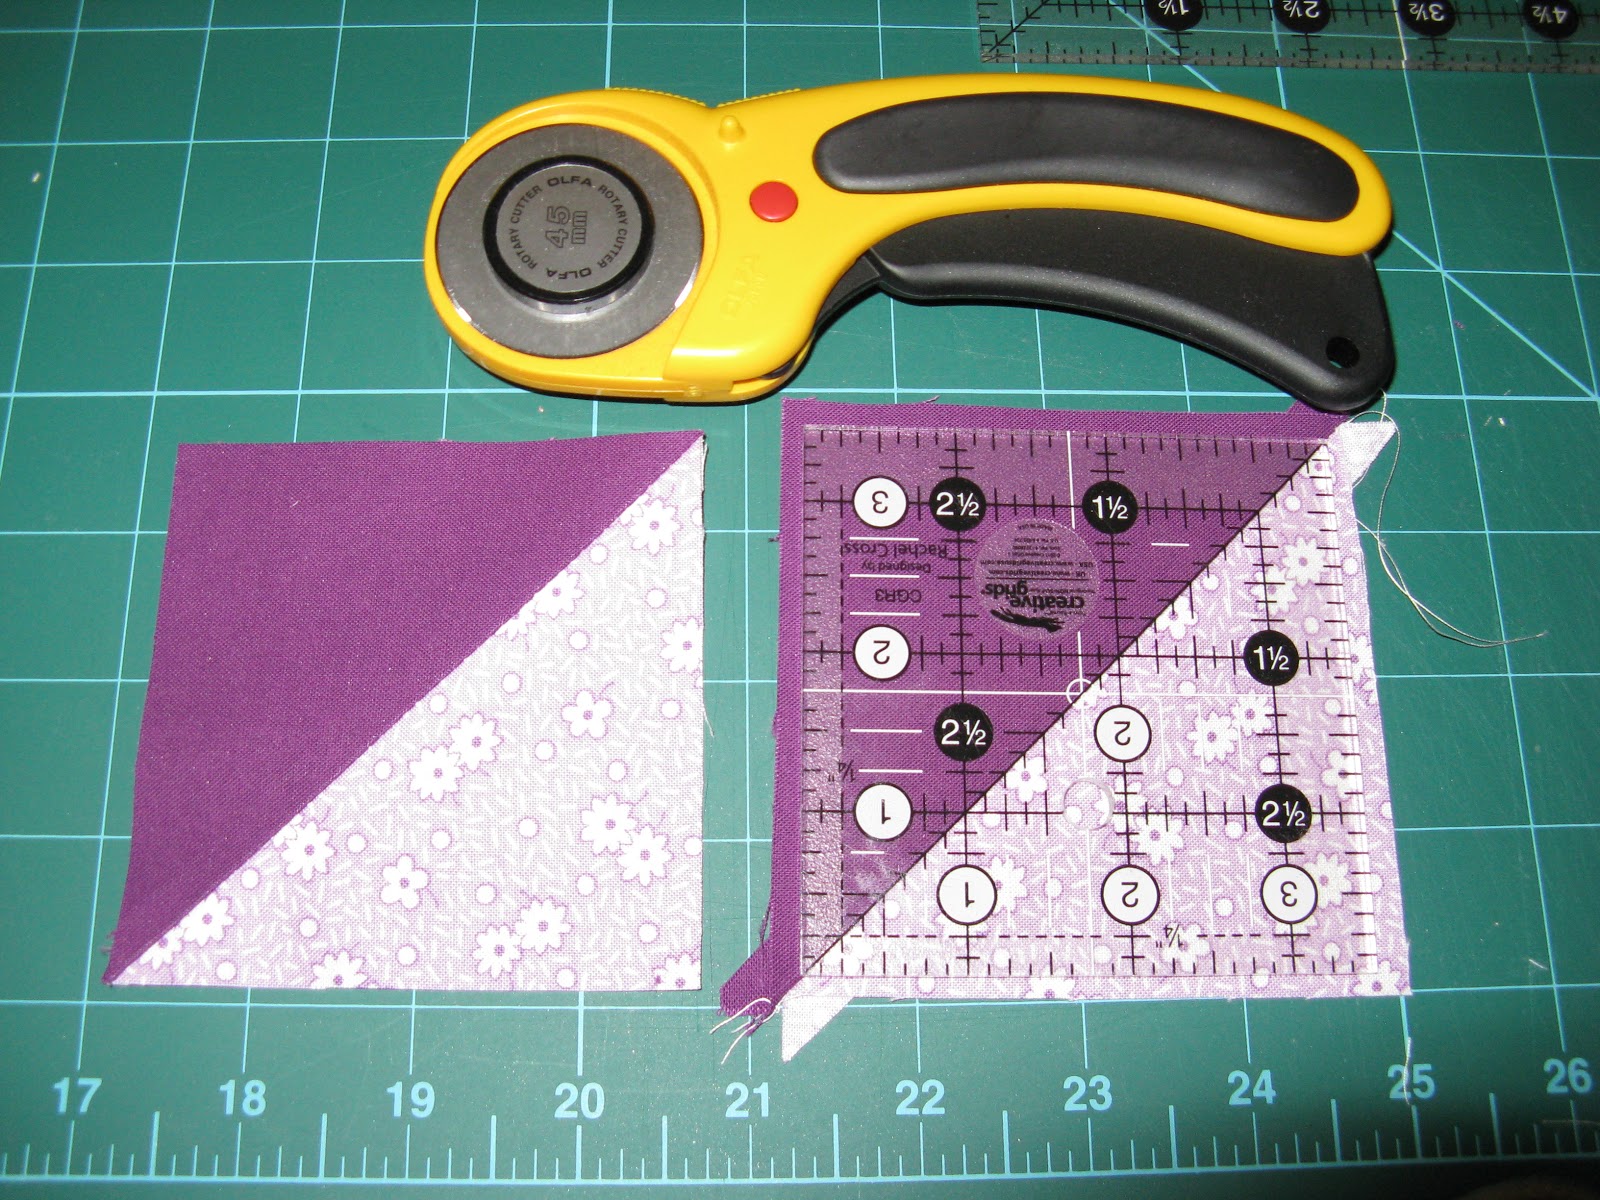
Iron the seams open and trim the half square triangles so that they are 3.5 inches. As the photo shows (it's a 3.5 inch square) you should have a reasonable amount to trim.
Lay out your squares and pressed and trimmed half square triangles in the pattern above until you have a design you're happy with. Then sew together firstly in pairs across the rows, then sew the two pairs in each row together and then sew the rows together, being careful each time to line the seams up (I prefer to do this free hand and unpick if I need to but you might find pins help, depending on how you like to sew). I pressed each seam open as I sewed it but I don't mind if you press open or to the side, whichever works for you.
You should now have a block that looks similiar to this. I'm sure it took me longer to pick and cut the fabrics for you all than it will take to sew up but I think it's really striking and I'm looking forward to seeing how you organise the fabrics and which fabrics you include.
The finished block size that you'll send back to me should be 12.5 inches square. If you have any questions please let me know and I hope you enjoy making it.
Thursday, 1 November 2012
Miss November
It's my month and I was going to be so organised! Then last week I was sorting my fabrics from my stash (I had decided I wasn't going to buy any fabric for my bee blocks) and discovered I didn't have enough of any one colour for the background and the pattern would only work if I gave you all the same! An emergency order from the wonderful Justine at Simply Solids means I now have the fabric I need but am a day behind with getting things sorted. I hope to get the block instructions online tonight though and fabrics posted out tomorrow to those in the UK and Monday to those overseas.
So this is a bit of a 'sorry' post - but I will wet your appetite with a taste of the fabrics you'll be getting, more on these in the instructions post:
I have finally finished my October block for Jessica. I was really late starting as the fabric arrived whilst I was on holiday so it was already 20th October before I could start. I decided I would just make one more complicated block (we could make one or two) and I picked one called Tradewinds as I used to live in a flat in a block called Tradewinds so it seemed appropriate! I had some trouble with my corner points so some are slightly flat but hopefully the overall effect is good - it'll be on the way across the Atlantic very soon.
Whilst I'm posting I also wanted to share with something else I'd been working on - using a couple of charm packs I bought from the talented Karen at Blueberry Park who designs and prints her own fabrics. I spent ages practising my half square triangles for this - hope I've cracked them now:
Karen suggested I make it into a mat for a table centre and I think that'll be great, just need to work out what fabric I can use for binding and backing.
I'll be back tonight with instructions and I'll use my camera rather than my phone for the photos next time!
Saturday, 27 October 2012
A Dandy
This month saw the blocks of quilt 2 of the Anything Goes Quilting Bee being made.
The lovely Jessica of Plum Patchwork sent out some amazing fabric and posted a great post about the blocks she would like us to make. Traditional blocks were the order of the day!
The fabrics that arrived were simply gorgeous and it has taken me most of the month to decide just how to cut into them! I simply loved them - it did cross my mind to slip them into my secret stash, but I think Jessica would shout at me!
Jessica requested 12" blocks and pointed us in the direction of Quilter Cache that has a huge list of suitable blocks. I looked through the list again and again until I came across this block:
So one of the blocks was complete, but I hadn't used the other fabric Jessica sent me. So I had another long look at the list.... and I found A Dandy:
It is very similar, but different. I am really pleased with both blocks and I hope that Jessica will like it when it finally lands on her doormat on the other side of the pond!
I have had a sneak peek at November's block and I am really looking forward to the fabric arriving!
The lovely Jessica of Plum Patchwork sent out some amazing fabric and posted a great post about the blocks she would like us to make. Traditional blocks were the order of the day!
The fabrics that arrived were simply gorgeous and it has taken me most of the month to decide just how to cut into them! I simply loved them - it did cross my mind to slip them into my secret stash, but I think Jessica would shout at me!
Jessica requested 12" blocks and pointed us in the direction of Quilter Cache that has a huge list of suitable blocks. I looked through the list again and again until I came across this block:
It's called The Dandy Quilt and comes from the 1930's, which along with the 1940's fascinates me. I will be totally honest here and say I miss read the instructions and cut the fabrics slightly wrong... but I did get there on the second attempt!
So one of the blocks was complete, but I hadn't used the other fabric Jessica sent me. So I had another long look at the list.... and I found A Dandy:
It is very similar, but different. I am really pleased with both blocks and I hope that Jessica will like it when it finally lands on her doormat on the other side of the pond!
I have had a sneak peek at November's block and I am really looking forward to the fabric arriving!
Subscribe to:
Posts (Atom)


